-
SRS Diagnostic using DRBII:
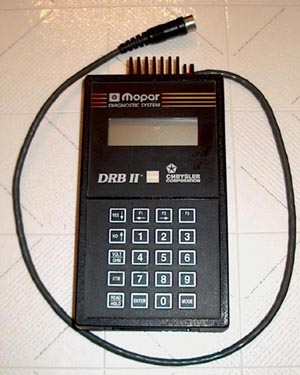
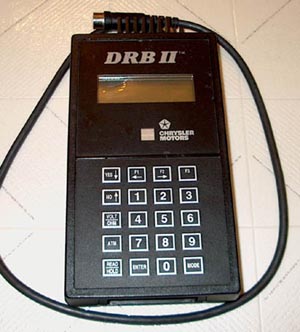
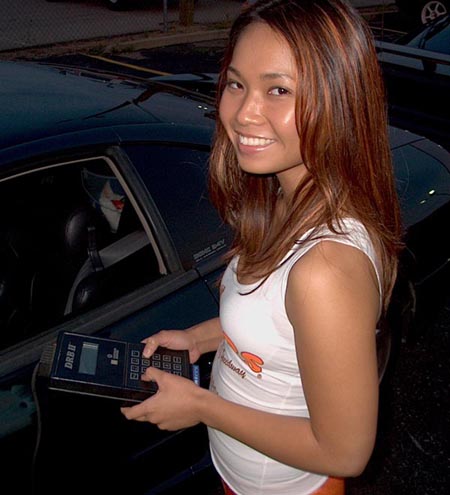
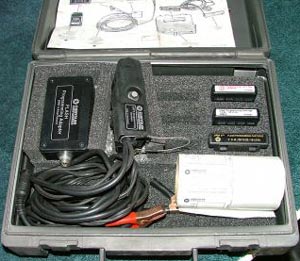
- DRBII Main control Box. DRBII Main control Box. This is a 4.5x8ö box with digital display and a fairly large keypad.
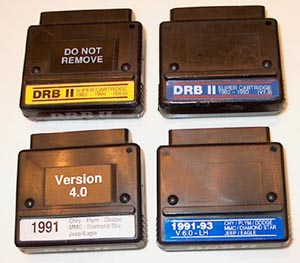
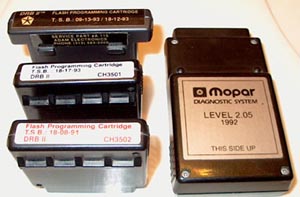
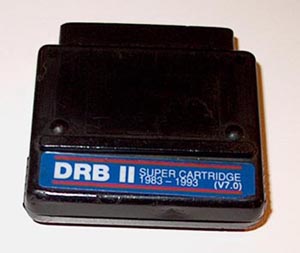
- DRB Cartridge for your car. The best cartridge is a ōSuper Cartridgeö A Super Cartridge covers multiple years
and cars. A very desirable cartridge in the blue 91-93 Super Cartridge. This will work for All 91-93 Chrysler,
Dodge Stealth 3000GT and DSMs. The best cartridge I know of is the Yellow label 1983-1994 Super Cartridge
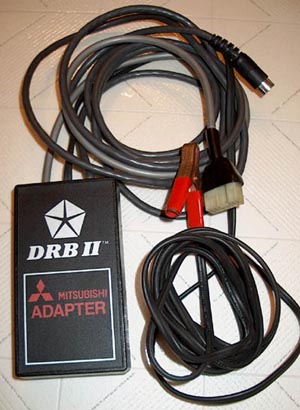
Most DRBIIs are sold with no cartridges at all, or a cartage that has very limited usage so be carefull. - MMC Adapter (P/N MM1000). This is a 3x6ö box with wiring harnesses that allow a DRBII to connect to a DSM,
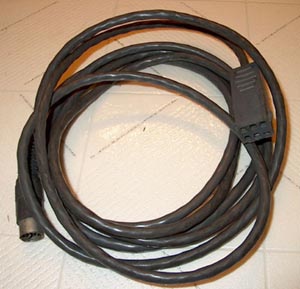
3000GT or Stealth. Many DRBII are Not sold with this adapter but I have found the adapter sold separately. - 94 Y-cable. This harness is only needed to connect to 94 & 95 DSM, 3000GTs and Stealths.
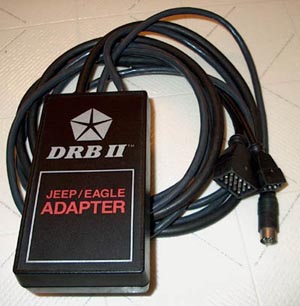
Please Note: If you do not have a 94 compatible cartridge this is useless. - Jeep/Eagle Adapter (P/N JE1000), This is a 3x6ö box with wiring harnesses that allow a DRBII to connect to a
Jeep or Eagle. Many DRBII are Not sold with this adapter but I have found the adapter sold separately.
THis is NOT needed with some Jeeps/Eagle. I do not know the exact usage of this yet... - Co-Pilot. This is a data recorder that is installed in car. When intermittent problem occurs you hit a
button to record. A DRBII is needed to download the stored data. - SRS diagnostic Manual. The DRB is Really easy to use but this helps to figure out airbag codes.
- SCI Cable (P/N CC2000) This is the Engine Diagnostic cable for Chrysler cars. Not needed on Stealth or 3000GT
- CCD Cable (P/N CC1020) This is the Body Cable for some year Chrysler cars. Not needed on Stealth or 3000GT
- FIRST Read 3000GT factory SRS diagnostic manual!
- Connect the 8-way DIN connector of the DBRII to the 8-way DIN connector of the MMC Adapter
- Plug the 12-way diagnostic connector of the MMC Adapter into the diagnostic connector of the vehicle.
The vehicleÆs diagnostic connector is located on the LH side of the dash next to the fuse box. - Attach the red alligator clip the battery positive terminal. Note: attach the red alligator clip last,
after the other two connectors are connected. - Turn the Vehicles ignition switch to the ōRUNö position. Note: Do not touch the keypad during the DRBII
power-up sequence or an error will result.
Updated 2/1/08
When I went to sell my 3000GT I had to finally fix the SRS light. My hatred of dealers put me on a quest to get aDRBII or MUTT II so I would never have a reason to go to a dealer again. I got screwed over multiple times on EBAY
by people selling DRB units that appeared to be complete but were missing cartridges or adapters. I also bought untested
DRB units just to get the cartridges. As I expected untested meant they were broken. It took almost 5 separate EBAY
auctions at a total cost of $1400 to get 2 functioning DRB II units. It was still cheaper than what the dealer wanted
to fix a G-force sensor error code, so it was still a good deal. I felt that I should share my experiences so other 3S
owners will not have to struggle as much as I did. I also started a thread on 3SI with pictures:
Link to DRB II thread on 3SI
If you want to diagnose the Airbag (SRS) system on your car you will need a DRBII or a MUT II.
The Mitsubishi version is a MUTT II but I have never used a one and the DRB II unit worked on 3000GTÆs too.
A DRBII is a special dealer only diagnostic tool that was not sold to the general public.
Now that newer versions are available you can often find them on EBay.
If you buy from EBay you need to make sure you get every part you need.
A DRB III is the newer version but it costs around $3000 on Ebay. If your car is newer than a 95 you are stuck
paying big bucks or going to a dealer. If you are buying a DRB II unit on Ebay make the seller verify that it
works and make sure you get the necessary parts listed below.
The following parts are REQUIRED to use a DRBII.
The following parts are OPTION to use a DRBII or parts not used on 3000GT or Stealth.
Picture collection:
Newer Style DRB II shown below
Older style DRB II shown below
Jeep/Eagle Adapter shown below
Mitsubishi Adapter shown below
Varius SuperCartridges shown below
SCI Cable (P/N CC2000)

CCD Cable (P/N CC1020)
General: How to Use the DRB tool
- link to 3000GT factory SRS diagnostic manual!
- To reach help menu at Anytime press and hold the [F3]
- Tom move forward or backward one item at a time within a menu, press the up or down arrow keys
- To select and item, press the item number or move the arrows to the desired item and press enter.
- To return to a previous display, press ATM
- To monitor one item of a multiple-item display, move the arrows to the desired item and press ENTER.
- To freeze a variable display time, press READ/HOLD. To unfreeze the item, press READ/HOLD again.
- To restart the DRBII, hold MODE and press ATM at the same time
The DRB II is really easy to use.
AIRBAG (SRS) DIAGNOSIS:
Connect the DRBII to the vehicle as follows.
The DRBII will display the vervsion and rev level of the software for a short time.
After A few seconds the main menus will come up Note the menu is larger than the display screen so you will have to
use the down arrows to see all of the options.
---- DRB II ----
1) VEHICLES TESTED
2) HOW TO USE
3) CONFIGURE
4) SELECT SYSTEM
Select ō4) SELECT SYSTEMö
---- DRB II ----
1) ENGINE
2) TRANSMISSION
3) SUSPENSION
4) ABS
5) AIR BAG
Select ō5) AIR BAGö The sysyem will display the ECU number and after a few seconds go to the air bag menu.
---- AIR BAG MENU ----
1) SYSTEM TESTS
2) READ CODES
3) STATE DISPLAY
4) ACTUATOR TESTS
5) ADJUSTMENTS
Select ō2) Read Codesö
It will either display ōNo codes detectedö or list the error codes 1 at a time.
You must use the down arrow to see every code before you can erase any codes.
Press the ōATMö button. The display will change to read as follows
---- AIR BAG MENU ----
1) ERASE CODES
2) DONÆT ERASE CODES
Select ō1) ERASE CODESö to erase the codes. If there is a problem the code can not be erased until it is fixed.
Below is a list of air bag codes.
AIRBAG CODES:
(11) G-sensor trouble 1 (short) Sometimes bad sensor even when resistance is correct
(12) G-Sensor Trouble 2 (1 Open)
(13) G-Sensor Trouble 3 (2 Open)
(21) Squib Trouble 1 (Short)
(22) Squib Trouble 2 (Open)
(31) Condensor Voltage High
(32) Condensor Voltage Low
(33) Cranking Trouble
(34) Connector Unlocked, This is grounding bar on back of SRS ECU., flip it down and it should be fixed
(41) Ignition Voltage Low 1, Battery Probably went dead slowly at one time
(42) Ignition Voltage Low 2, Battery Probably went dead slowly at one time
(43) SRS lamp Trouble 1
(44) SRS lamp Trouble 2
(45) Diagnostic Module
Misc Pictures:
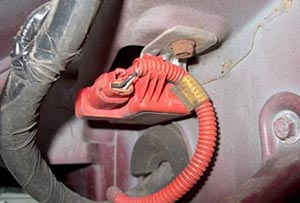
G-Force Sensor in Front wheelWells
Flash programming Tool
TSB Cartridges:
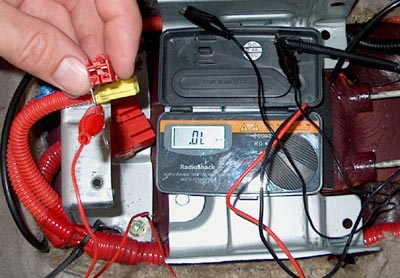
Circuit Checking
Supercartridge
Home